 Marius Masalar
Fujifilm X-Pro 2
Mirrorless, Matured

We’ve been waiting for this camera for a long time.
A lot rests on its shoulders, more than any model Fuji has released since the first X100. If you’re like me, you waited because there’s something about the way Fuji does cameras that demands consideration.
The X-Pro 1 was a step toward fulfilling the promise of a true mirrorless workhorse. It presented a unique combination of ergonomics and image quality, but fell short of being a professional staple. It was too slow for many scenarios, it wasn’t weather-sealed, it didn’t offer a dual card slot or particularly good battery life.
The X-T1 addressed many of those problems, but it was modelled after the DSLRs it was destined to replace, lacking the optical viewfinder and rangefinder styling of the X-Pro 1 and X100 family.
In the tech world, a lot happens in four years, but for Fujifilm it’s all been leading up to this: the X-Pro 2 is finally here.
Note: This review is based on time spent with a pre-production model. As such, minor details of the physical design are subject to change, and I’ve not included any full-res or RAW-processed images from the camera for detailed examination—those will come in a future article once I’ve explored the final hardware and firmware in depth.
A New Flagship
For all its physical similarities, the X-Pro 2 is an altogether different beast. For one thing, it’s fast. Since this was probably the single biggest complaint people had about the X-Pro 1, let me make it perfectly clear that Fuji has heard us and given this thing several shots of adrenaline.
That’s exciting, but it’s just the tip of the iceberg. It’s the first X series camera with an entirely new, higher resolution sensor. It’s weather-sealed. You get two card slots, an extraordinary EVF, the beloved OVF and the X100T’s Electronic Rangefinder mode.
I’ve been shooting with nothing but the X-Pro 2 for several weeks, and two things have become abundantly clear about it: Fuji is serious about this camera…and I’m seriously in love with it.
Design & Build
Unlike the X-T1, which felt natural the moment I picked it up (thanks to years of DSLR familiarity), it took me a while to get used to the original X-Pro 1.
It’s similar to the X100 series cameras, but there are just enough differences to make it an acquired taste. It turns out that the rangefinder form factor appeals to me though, and the X-Pro 2 is an intelligent refinement of its predecessor, addressing its ergonomic shortcomings without compromising the look or feel.
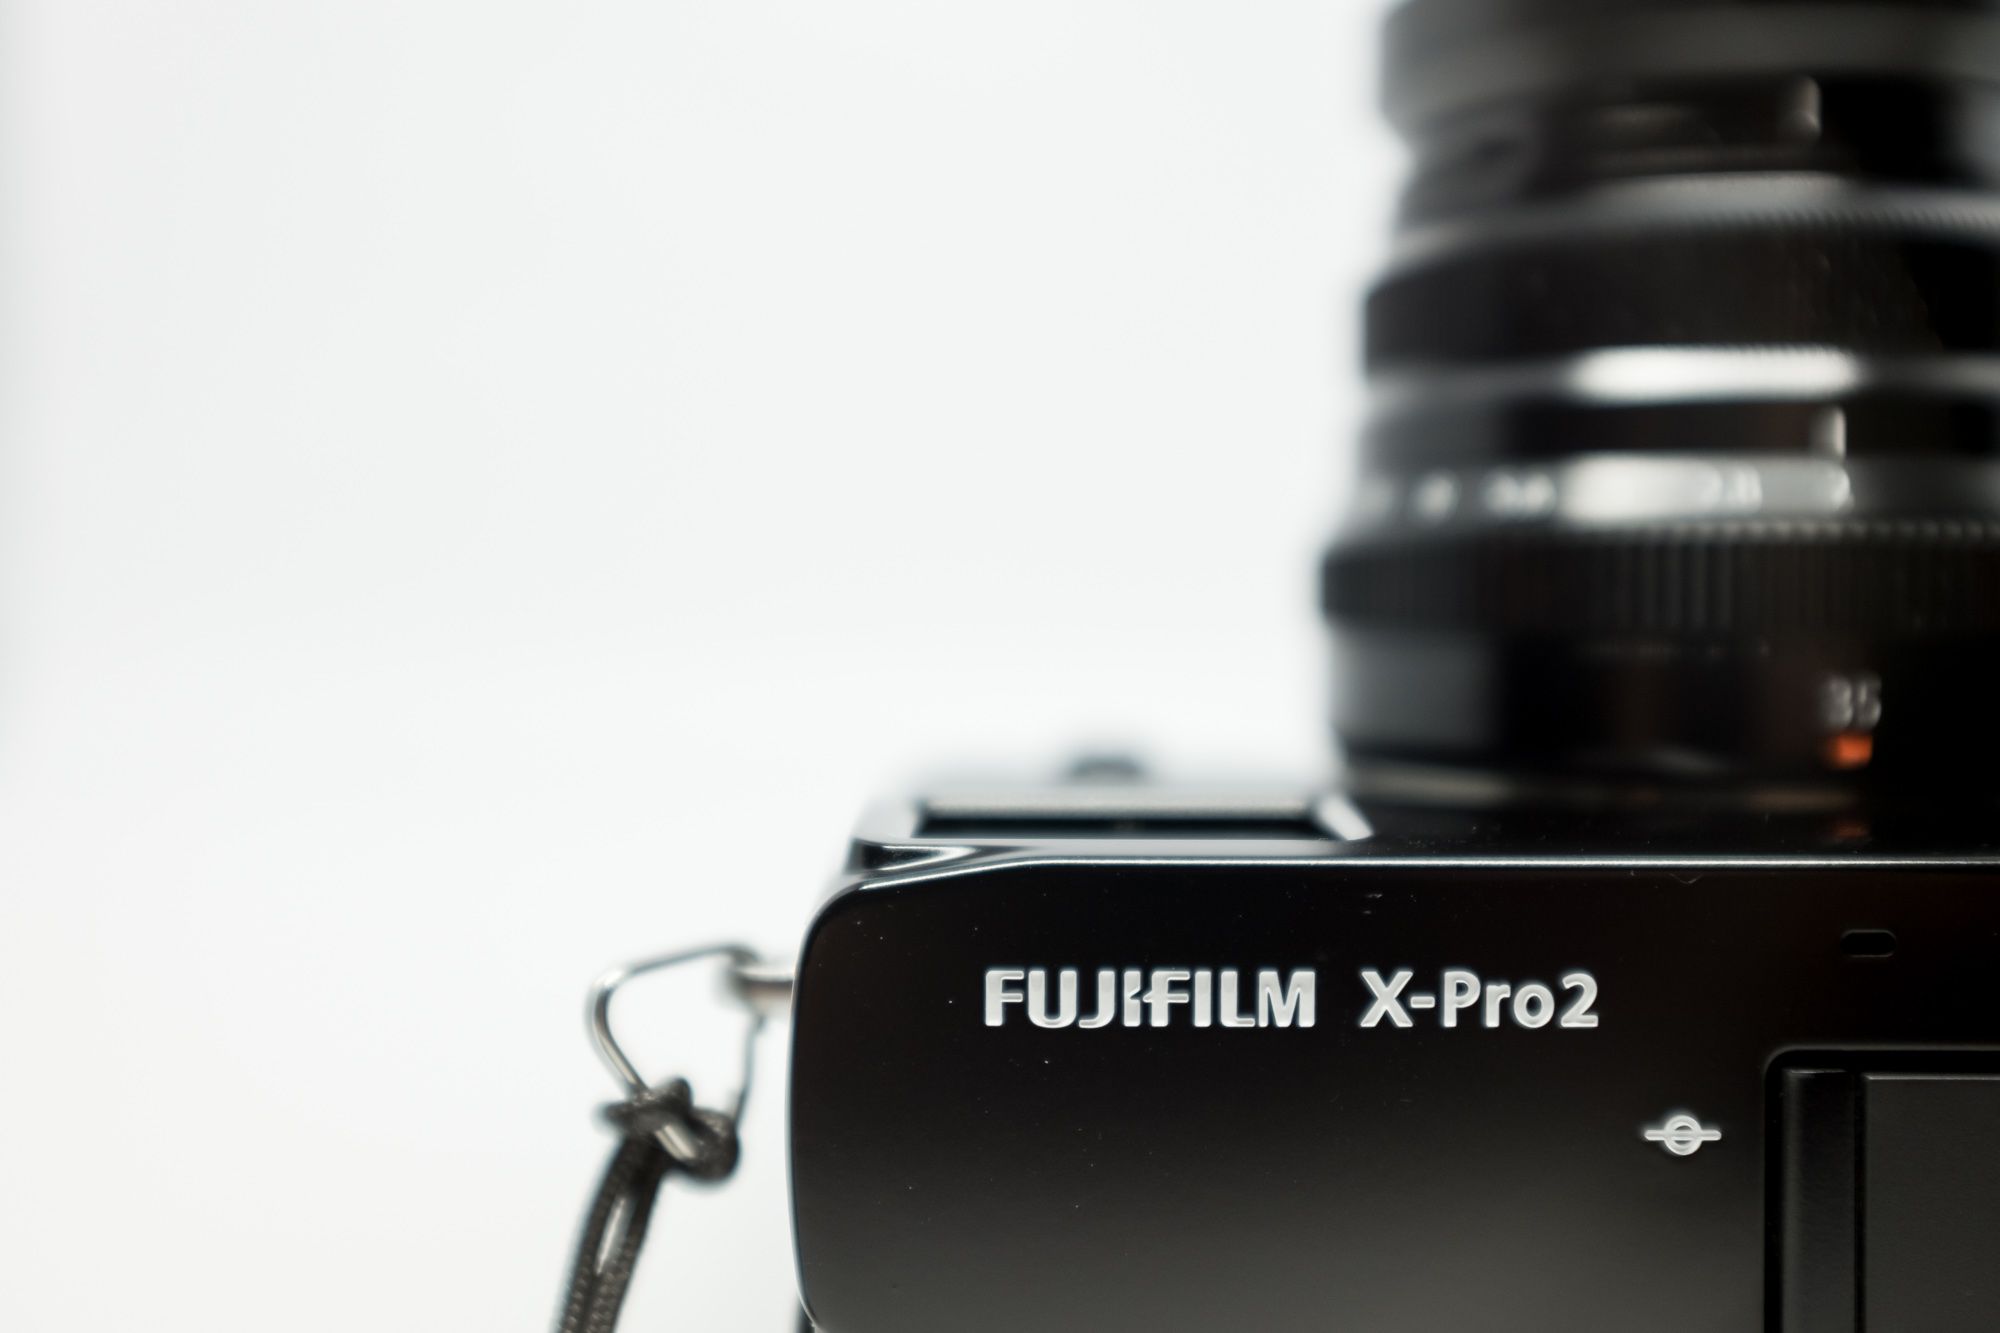
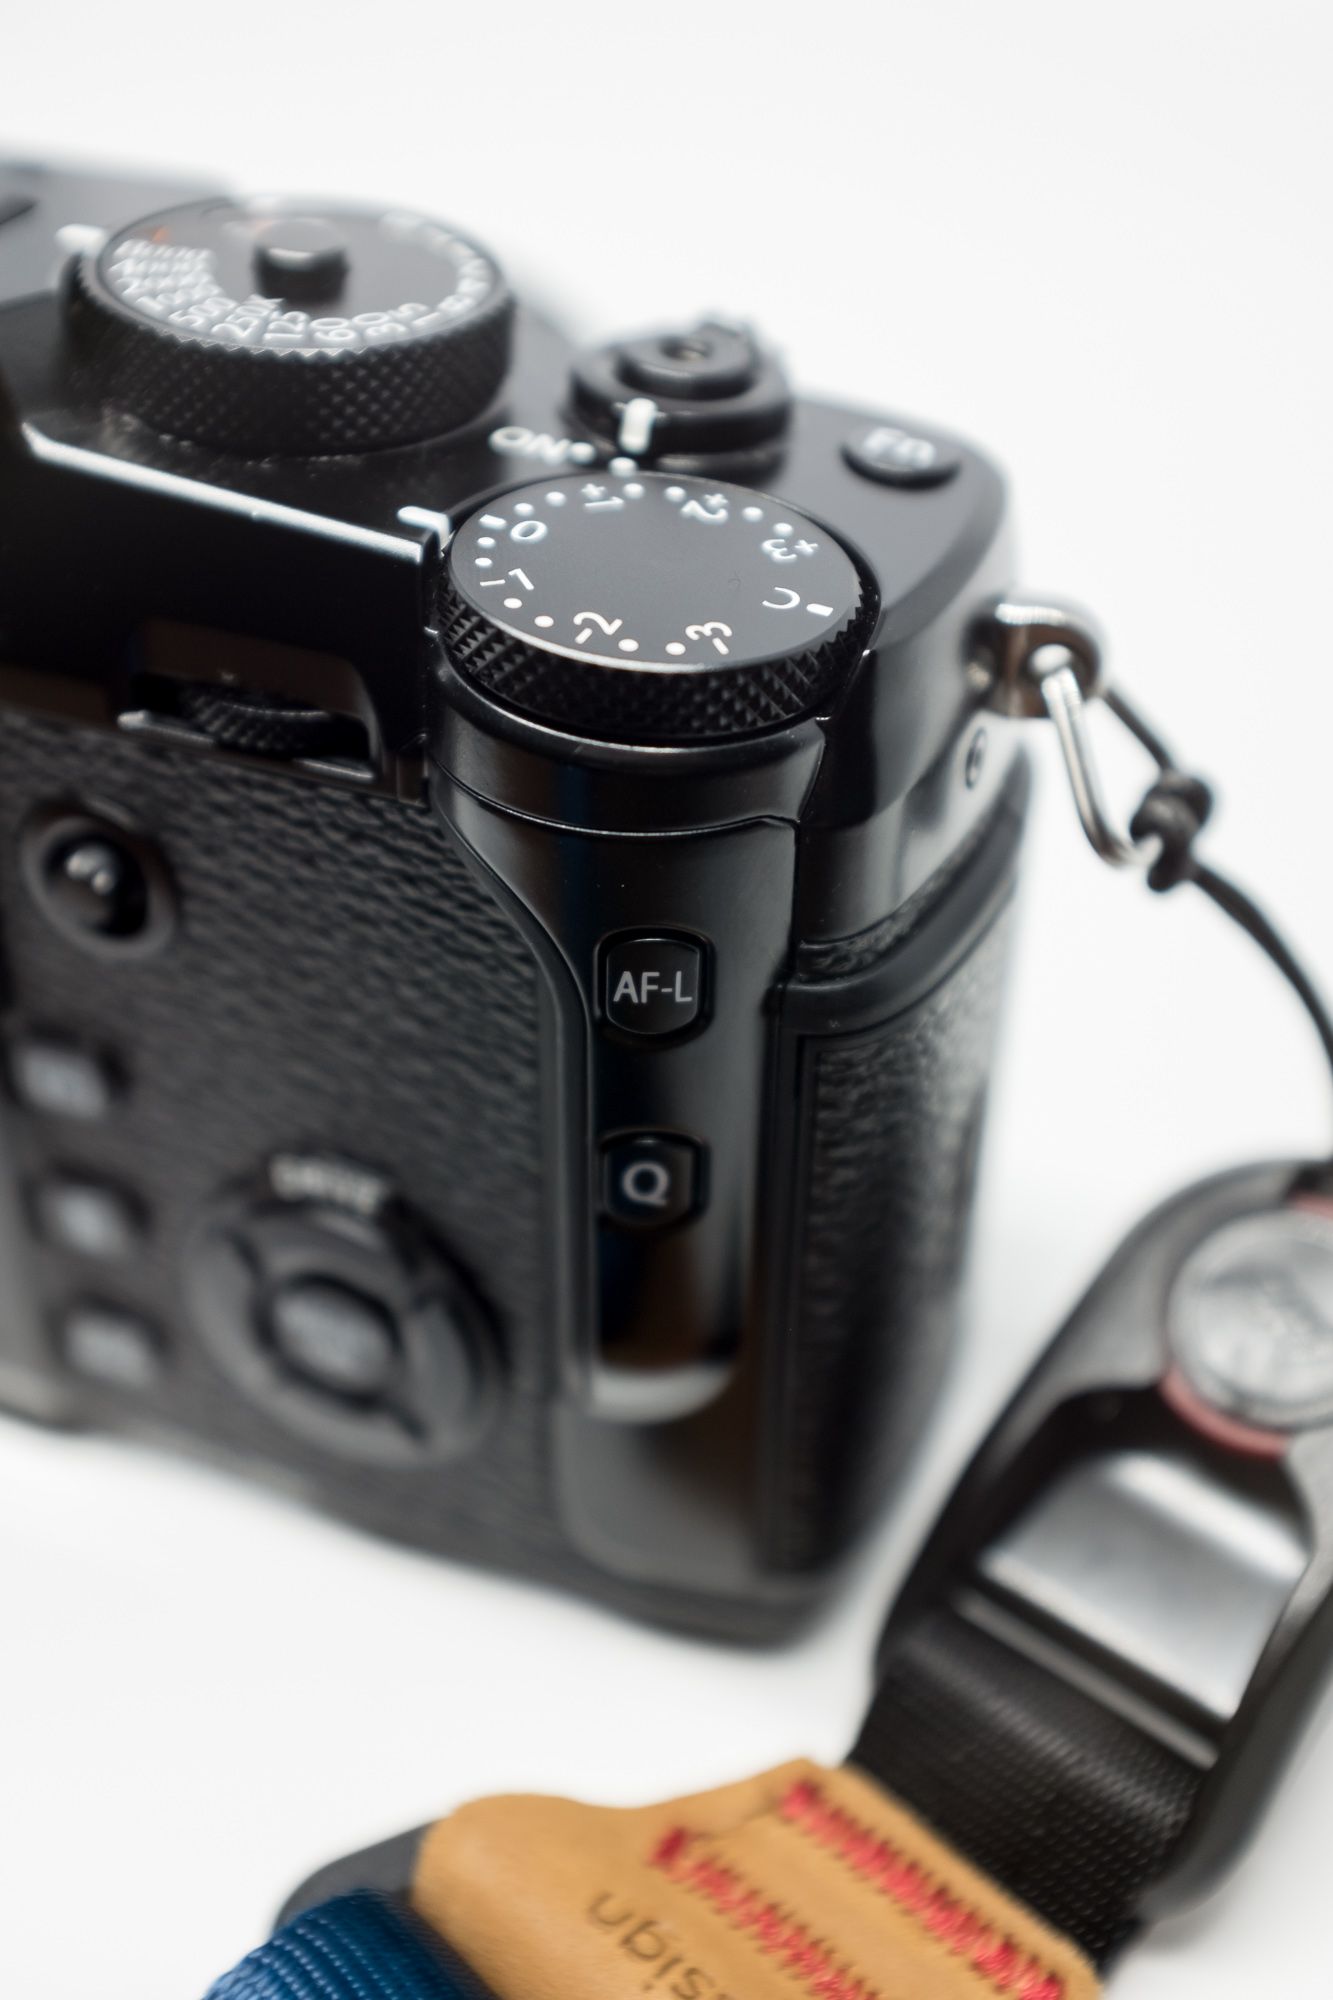
At a glance, the X-Pro 2 looks almost identical to the 1, which came in handy while I was walking around with the prototype. With the model name covered, only the most discerning camera enthusiasts would have noticed something was amiss. It’s only when you look closer that you begin to spot the differences: a new control dial on the front, a joystick on the back, a revised grip shape, re-arranged buttons, the dual card slot (which is thankfully separate from the battery compartment), and the shutter speed dial’s new ISO functionality.
Other areas remain essentially untouched: the focus mode switch, the EVF/OVF lever, and the power switch are just as you remember them.
Before delving into the details, it’s worth mentioning that the X-Pro 2 is now a weather-sealed camera, so if you pair it with one of Fuji’s ‘WR’ marked lenses, you’ve got yourself a durable, professional setup that you can confidently take out with you in difficult conditions.
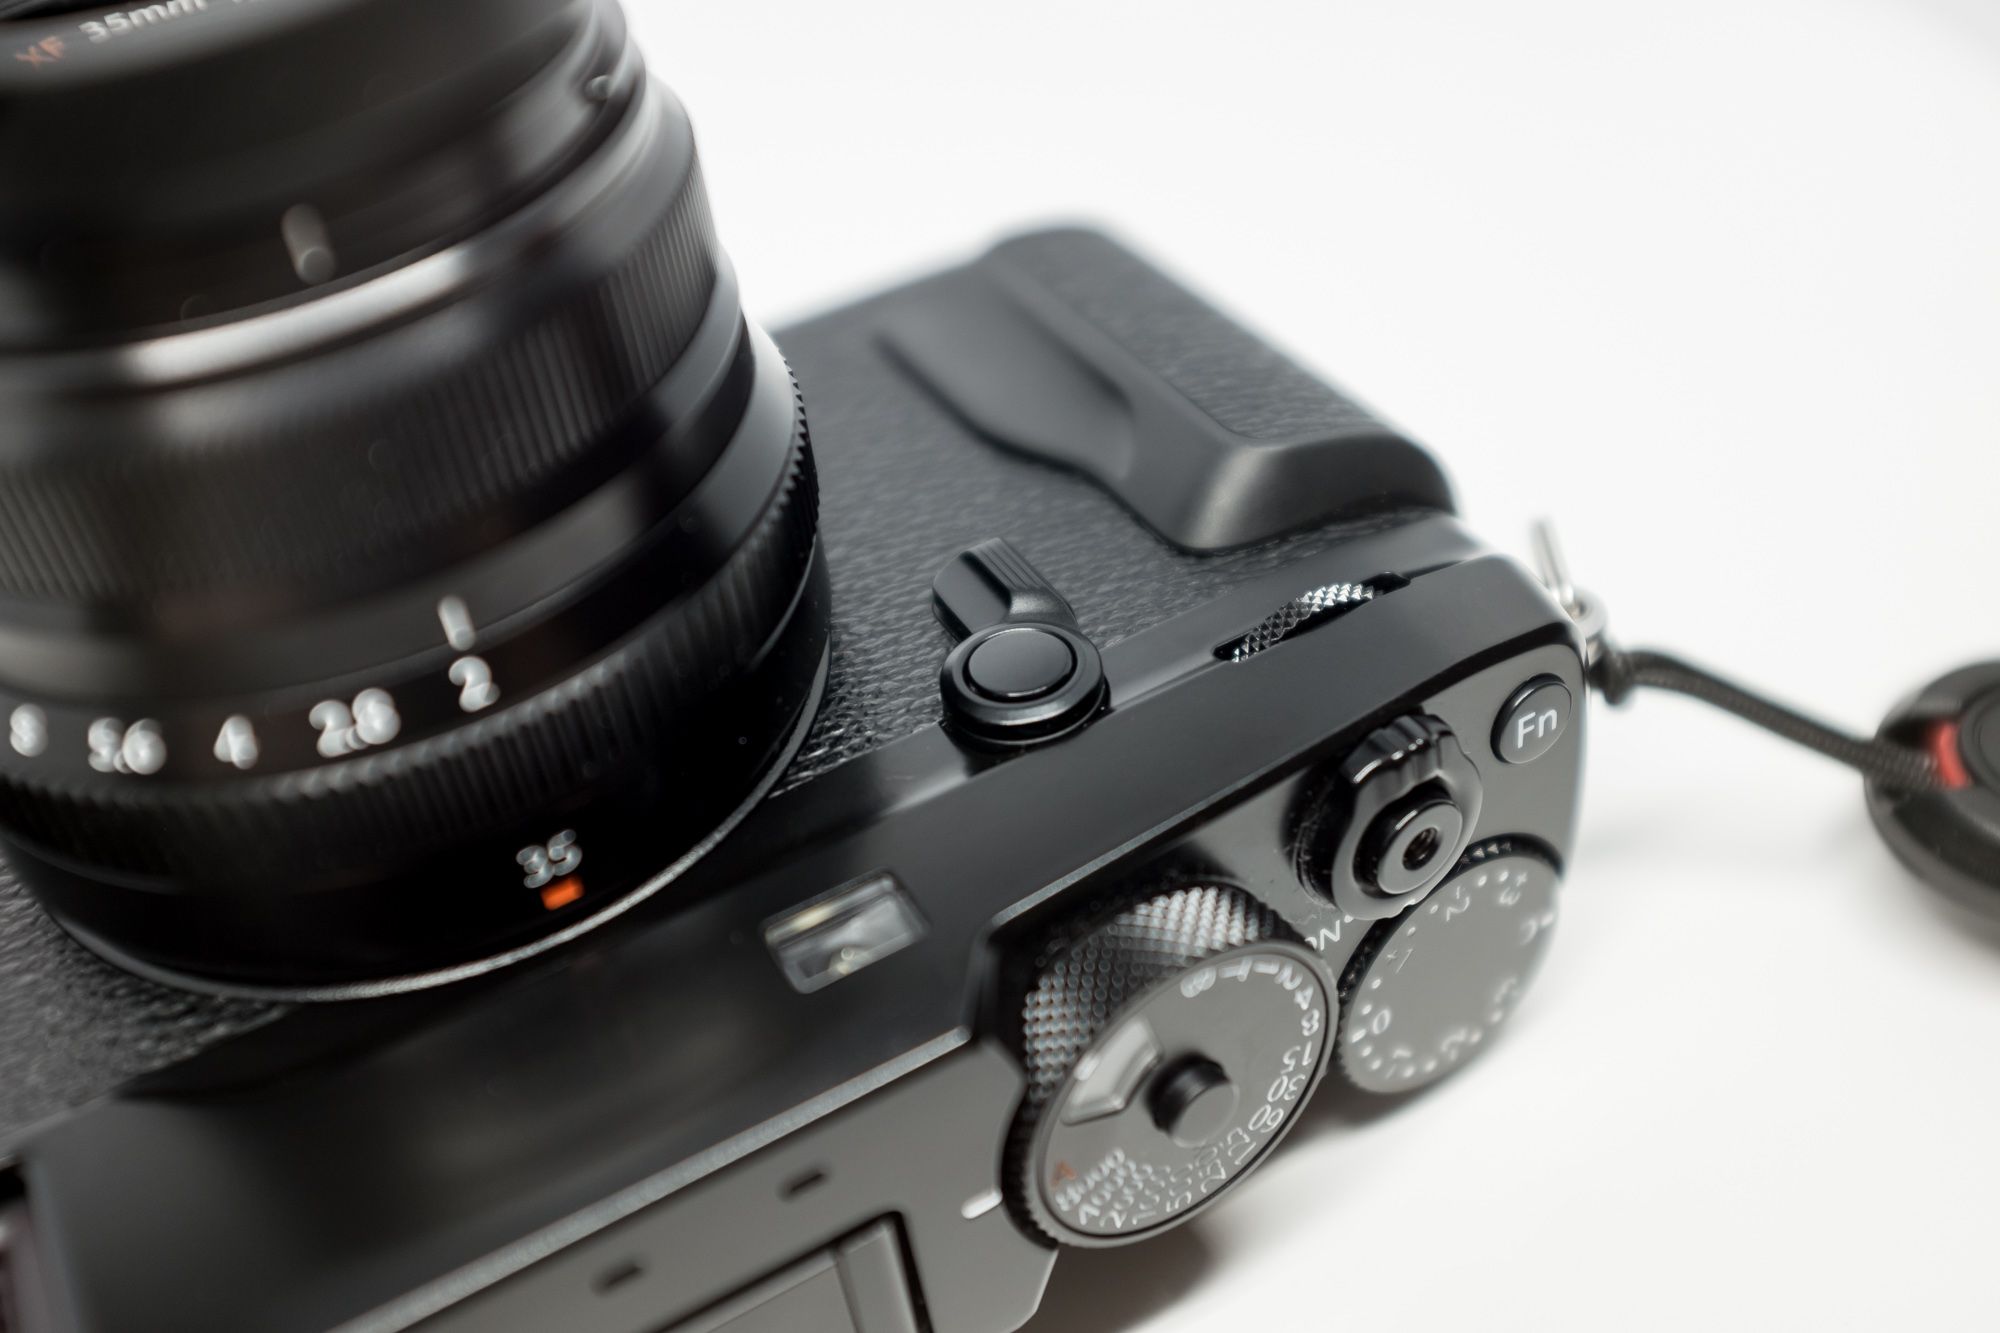
Buttons & Dials
Digging in, I found the button layout to be a vast improvement, consolidating everything to the right side of the screen for easy access and ensuring that none of the buttons are vulnerable to accidental nose presses when you’re using that magnificent viewfinder.
The buttons themselves have a satisfying travel, with a defined click rather than the pillowy feel of the early X-T1 hardware. The directional buttons in particular are very good, while some of the others (AF-L, Q) are more recessed.

Like the rest of the X Series cameras, the X-Pro 2 offers the same excellent system for setting up the assignable button functions to your liking. Pressing and holding on any of the 6 assignable buttons will bring you directly to a menu where you can choose its function. This makes re-mapping buttons easy, sparing you the usual chore of digging through several layers of menus.
The shutter speed dial now doubles as an ISO control, and the mechanism is interesting (not new though—similar systems existed for film cameras). The outer ring of the dial lifts up, allowing you to adjust the ISO without affecting shutter speed. It’s not immediately evident that this is how it works, but it’s a pretty ingenious solution that makes better use of space than having a new dial squeezed in.
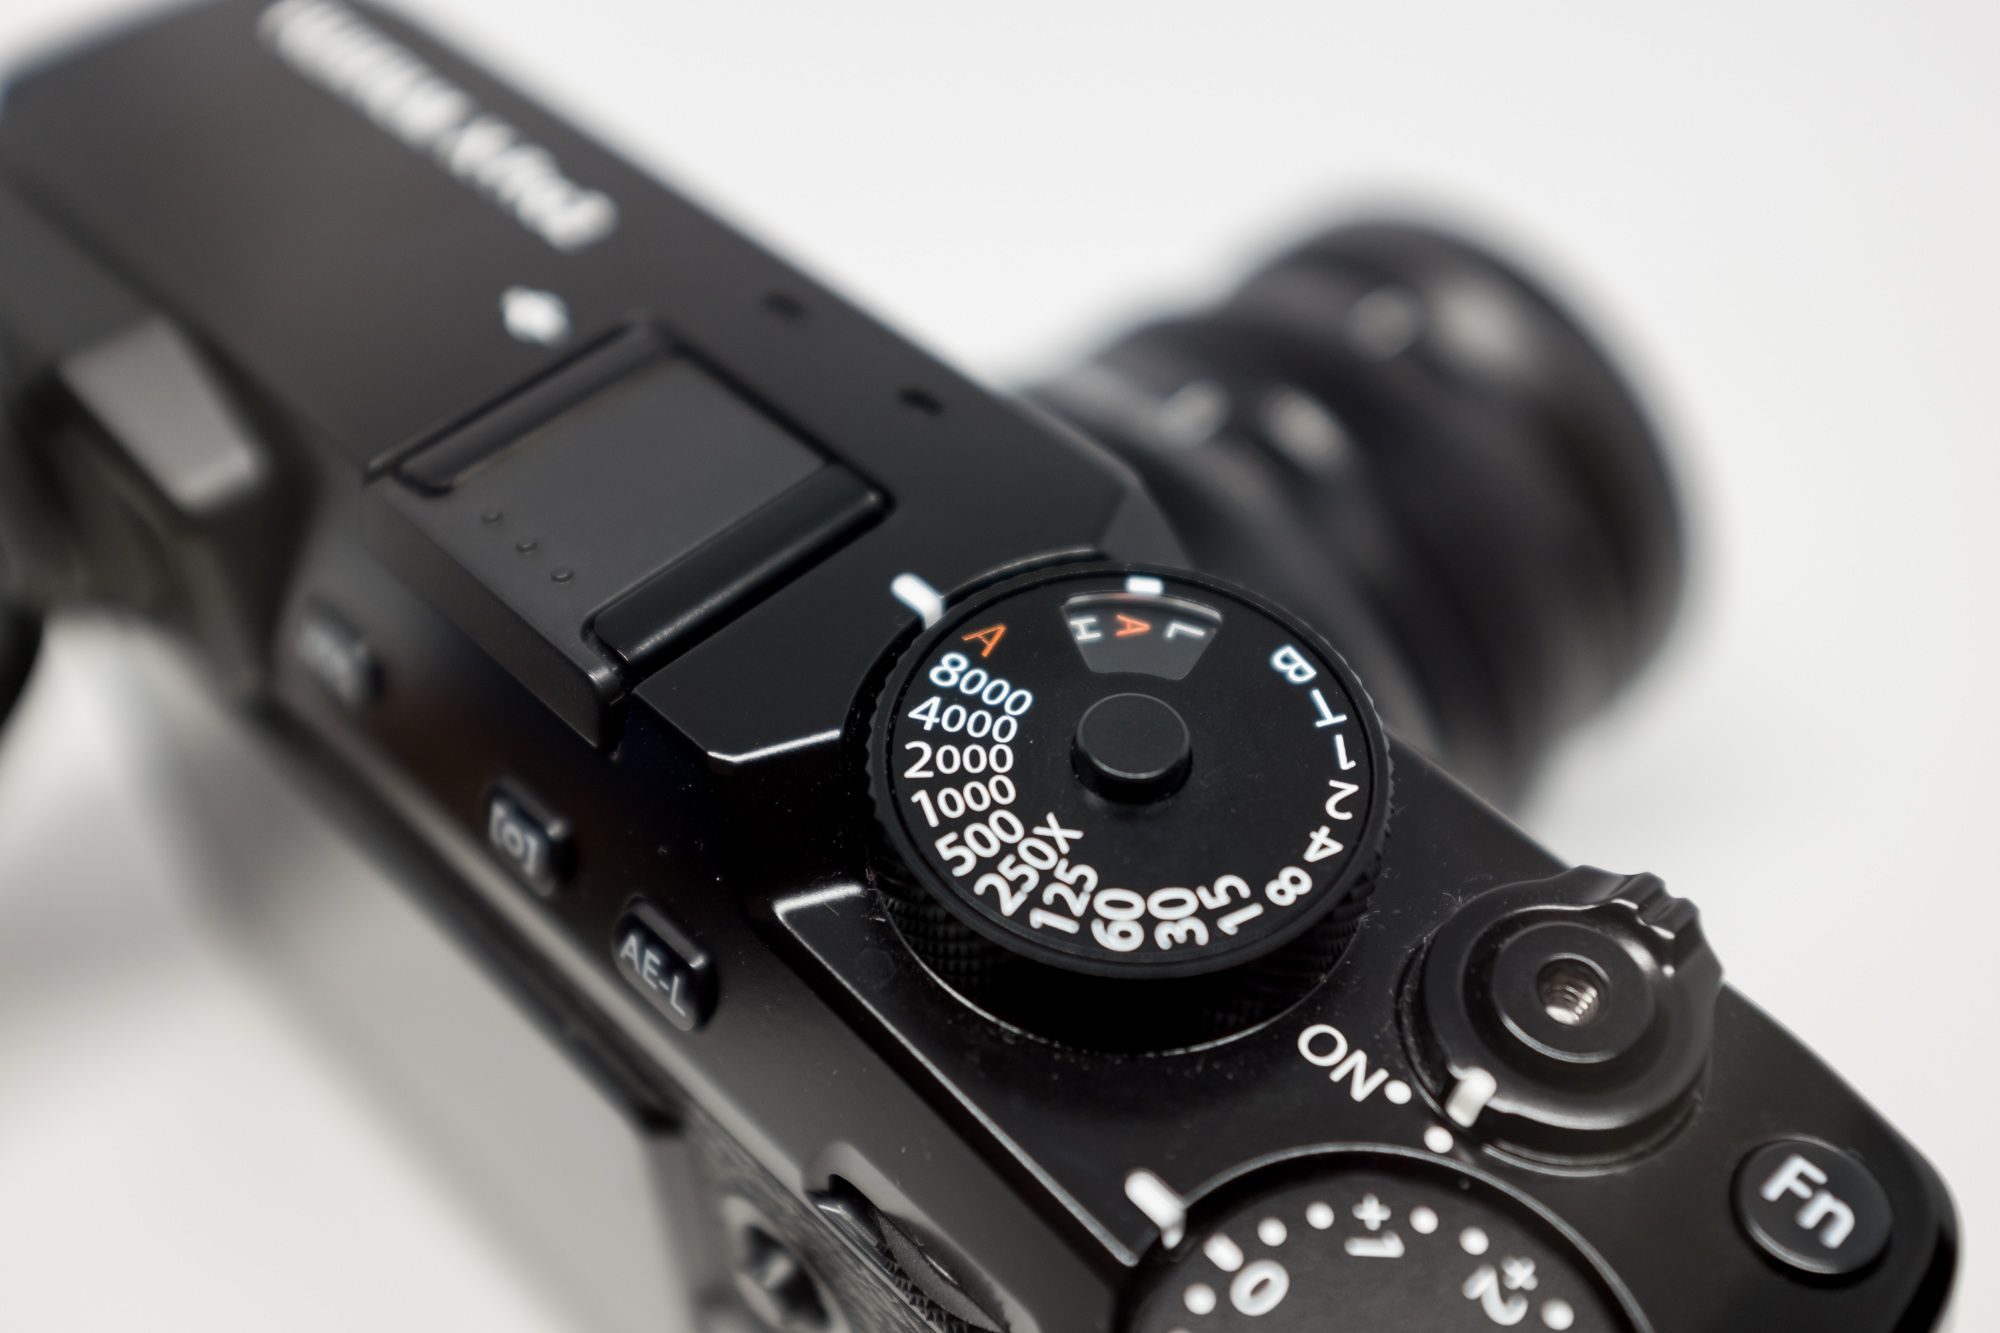
If you change ISO often, you might find this more annoying than a software-based approach, but if you leave one of the Auto ISO modes on or are okay with the way the X-T1’s physical dial works, you should have no trouble with this method. After all, value changes are visible in the viewfinder so you can still make adjustments without looking at the dial.
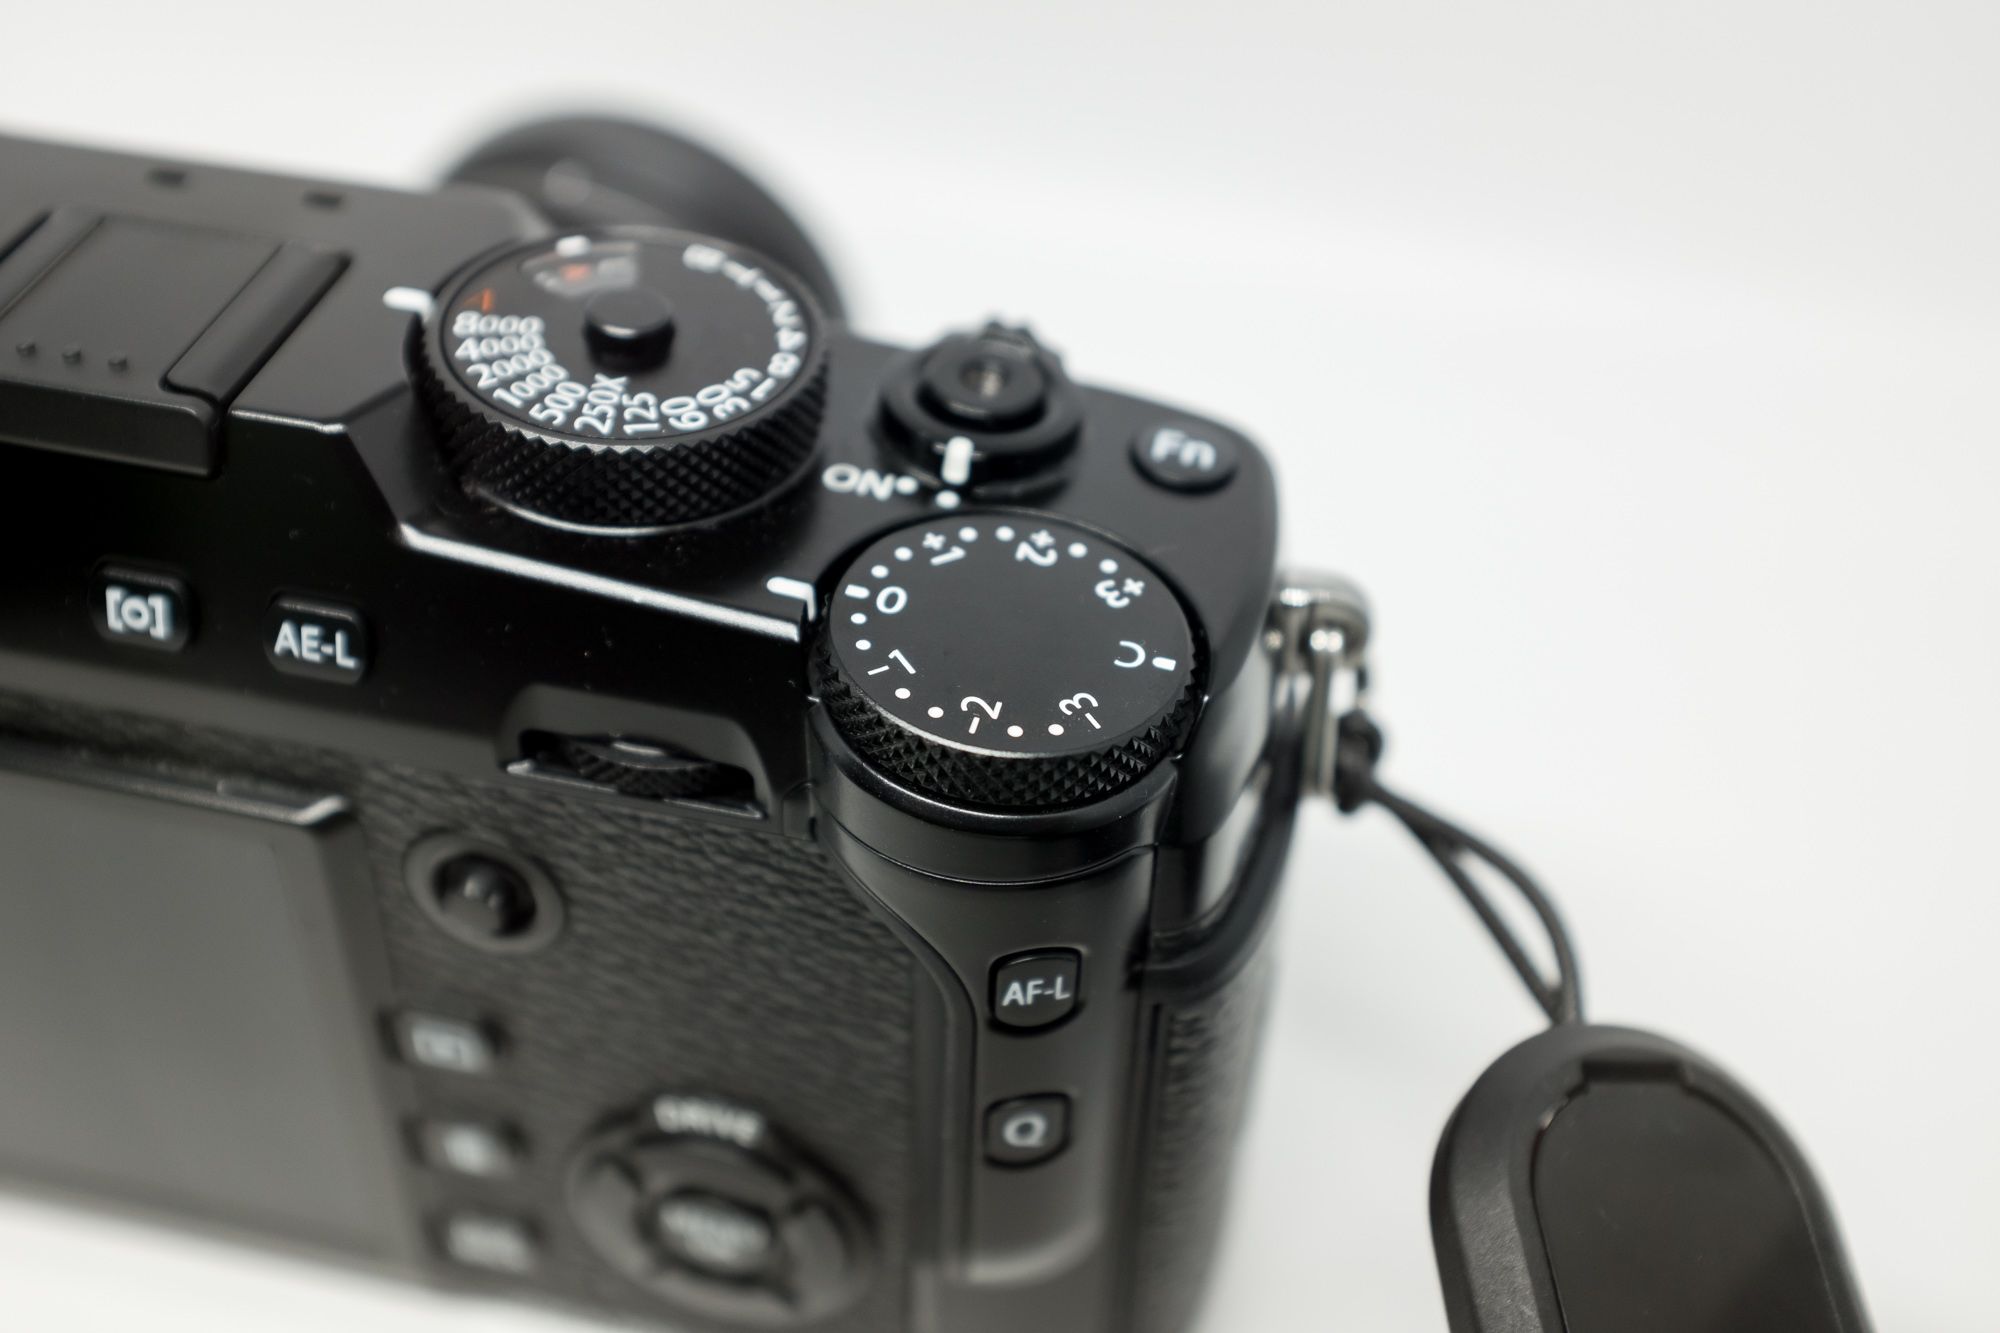
The exposure compensation dial has also received some attention. For one thing, it’s larger, which makes it easier to adjust. Its range has also been expanded to +/- 5 stops, but you might not realize it at first glance. The dial markings indicate +/- 3 stops (in 1/3rd stop increments), and the far end of the dial now has a ‘C’ setting. To access the rest, you have to first turn the dial to its ‘C’ position, then press the front command dial in and turn it to adjust between the full 10-stop range.
Joystick & Grip
The biggest improvement by far is the joystick. This little thing is a revelation, and its default functionality of choosing your AF points has entirely eliminated the focus-and-recompose method of capturing off-centre subjects—a poor habit I’m glad to be rid of.
Those of us with larger hands will also appreciate the new rear grip shape, which reminds me a bit of the Leica Q’s thumb valley, except the X-Pro 2’s isn’t indented into the body. Instead, it pushes outward into a comfortable, rubber-lined ridge that makes it easy to counter-balance the weight of the body using your thumb.
The AF-L and Q buttons have also migrated onto this new grip ridge, where they are within easy reach of your thumb, but not in its way when you’re just holding the camera. These two buttons are flush with the surface, so finding them while wearing gloves will take some muscle memory. Their placement is logical though, so I don’t see it as an issue.
If you lift your hand off the grip, you’ll be able to see the brand new dual card slot. I’ve been asking for this and I suspect that many professional photographers have also been holding out for a Fuji body that provides it. The slot is protected by a sliding door that closes firmly and won’t be accidentally knocked open.
Inside, I was happy to see that the two slots are not only well labelled but also vertically displaced from each other to make it easy to tell which card is which without having to look.
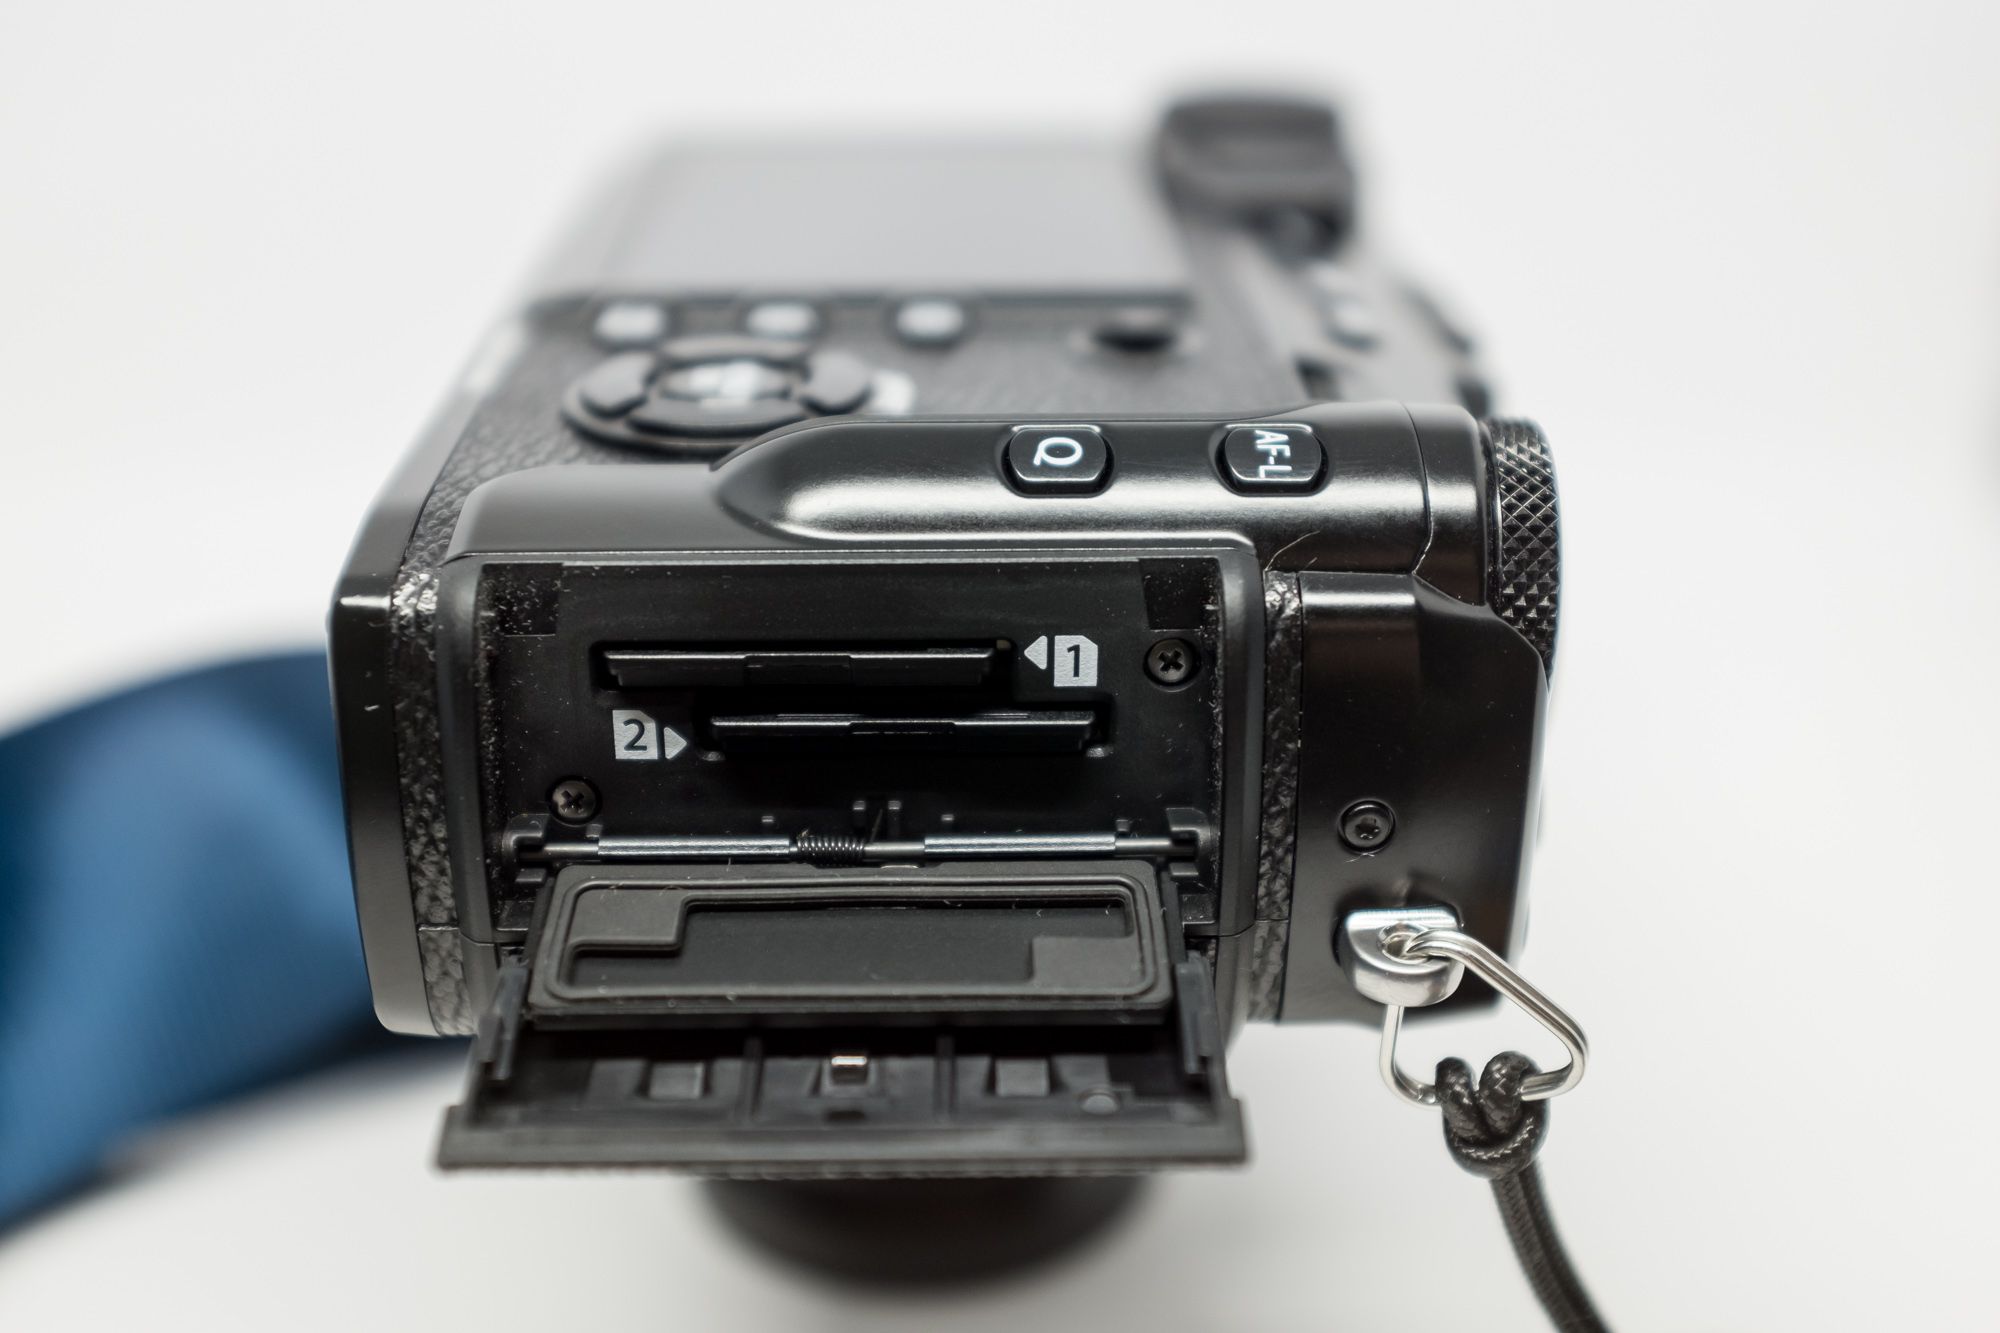
It’s details like this that make the X-Pro 2 such a joy to shoot with in a professional environment. Fuji has taken the time to make thoughtful improvements to a camera instead of just updating for the sake of it.
The X-Pro 2 is a sleek, handsome camera by all accounts, but for all its outer style, many of its most interesting enhancements are on the inside.
Under the Hood
When I sold my Canon gear, I didn’t miss the full-frame sensor at all, and I certainly didn’t miss the amount of processing I had to perform on those files to get them to look the way I wanted.
But I did miss the extra megapixels.
For example, animals are among my favourite photographic subjects, and the reality of wildlife shooting is that you often can’t get as close as you’d like to. As a result, the ability to crop in tighter in post is crucial, and the more megapixels available the more cropping you can do without compromising print-worthiness.
X-Trans III
The X-Pro 2’s brand new 24.3MP APS-C X-Trans CMOS III sensor neatly leapfrogs my old Canon kit. This isn’t an impressive number when compared to the 36MP Nikons or the 40+MP Canons and Sonys of the world, but to me it’s an ideal balance between image quality and file size.
After all, the quality of those pixels is more important than the sheer number of them, and I’m happy to say that the X-Trans III delivers the most wonderful files I’ve ever worked with.
At 24MP, the X-Trans array shows its full potential, and more importantly it reveals how extraordinary the XF lens line-up truly is. If you were pleased with the detail and rendering of micro contrast from lenses like the 35mm and 56mm on the X-Trans II bodies, just wait until you try it on the X-Pro 2.
It’s obvious that Fuji designed the lenses to out-resolve their early sensors, and that forward thinking is paying off now for everyone who’s invested in the system.
A Speedy New Image Processor
The new sensor is paired with a new High-Performance X Processor Pro chip that allows it to crunch the larger files without breaking a sweat. In tangible terms, the new processor is capable of the same burst speeds as the X-T1 (8fps or 3fps) but features a larger buffer and the ability to write either uncompressed or lossless compressed RAWs (both of which are still 14-bit).
Where the X-T1 could handle about 45 JPG frames at its highest 8fps continuous shooting rate, the X-Pro 2 delivers 83 before the buffer is full. For RAW images, you can get 33 lossless compressed or 27 uncompressed RAW frames. If you step down to the more pedestrian 3fps continuous speeds, you can shoot as many JPGs and compressed RAWs in a row as you can fit on your card.
Of course, this performance depends on your SD card read/write speeds too.
UHS-II and Dual Card Slot Perks
Besides weather sealing, one of the most significant improvements for my needs is the dual card slot I mentioned above.
One detail worth highlighting is that the first of the two card slots supports UHS-II, which means you can take advantage of the improved speeds of newer SD cards. Besides clearing the buffer faster, these cards also allow you to access the maximum buffer capacity while shooting bursts.
The dual slots work exactly as you’d expect them to, with three options for writing files:
- Sequential
- Backup
- Raw/JPEG
The first will fill the first card and then switch to the second, as though you had a single high-capacity SD card. The second mode writes the same image data to both cards simultaneously, ensuring that any corruption on one card doesn’t result in the loss of your images. The final option (my personal preference) is to split the images according to file type, writing RAWs on card 1 and JPEGs on card 2.
This makes it easy to grab the JPEG card and pull photos onto my iPad for viewing and editing, while keeping the RAWs handy for when I’m back at my computer.
While I wouldn’t use the X-Pro 2 for video, it does record it (at a max of 1080p @ 60fps). Video can only be recorded to the first card, in case you decide to give it a try.
Looking at You
If you’re buying an X-Pro 2, chances are you love optical viewfinders.
You’ll recognize its bright frame display and info overlays from the X100 series if you’ve shot with those, and now you can also take advantage of the picture-in-picture style “Electronic Rangefinder” from the X100T. This clever feature superimposes a small EVF panel in the lower right of the optical viewfinder window, providing access to digital split-image or highlight peaking focus assists while maintaining the rangefinder shooting feel of the OVF.
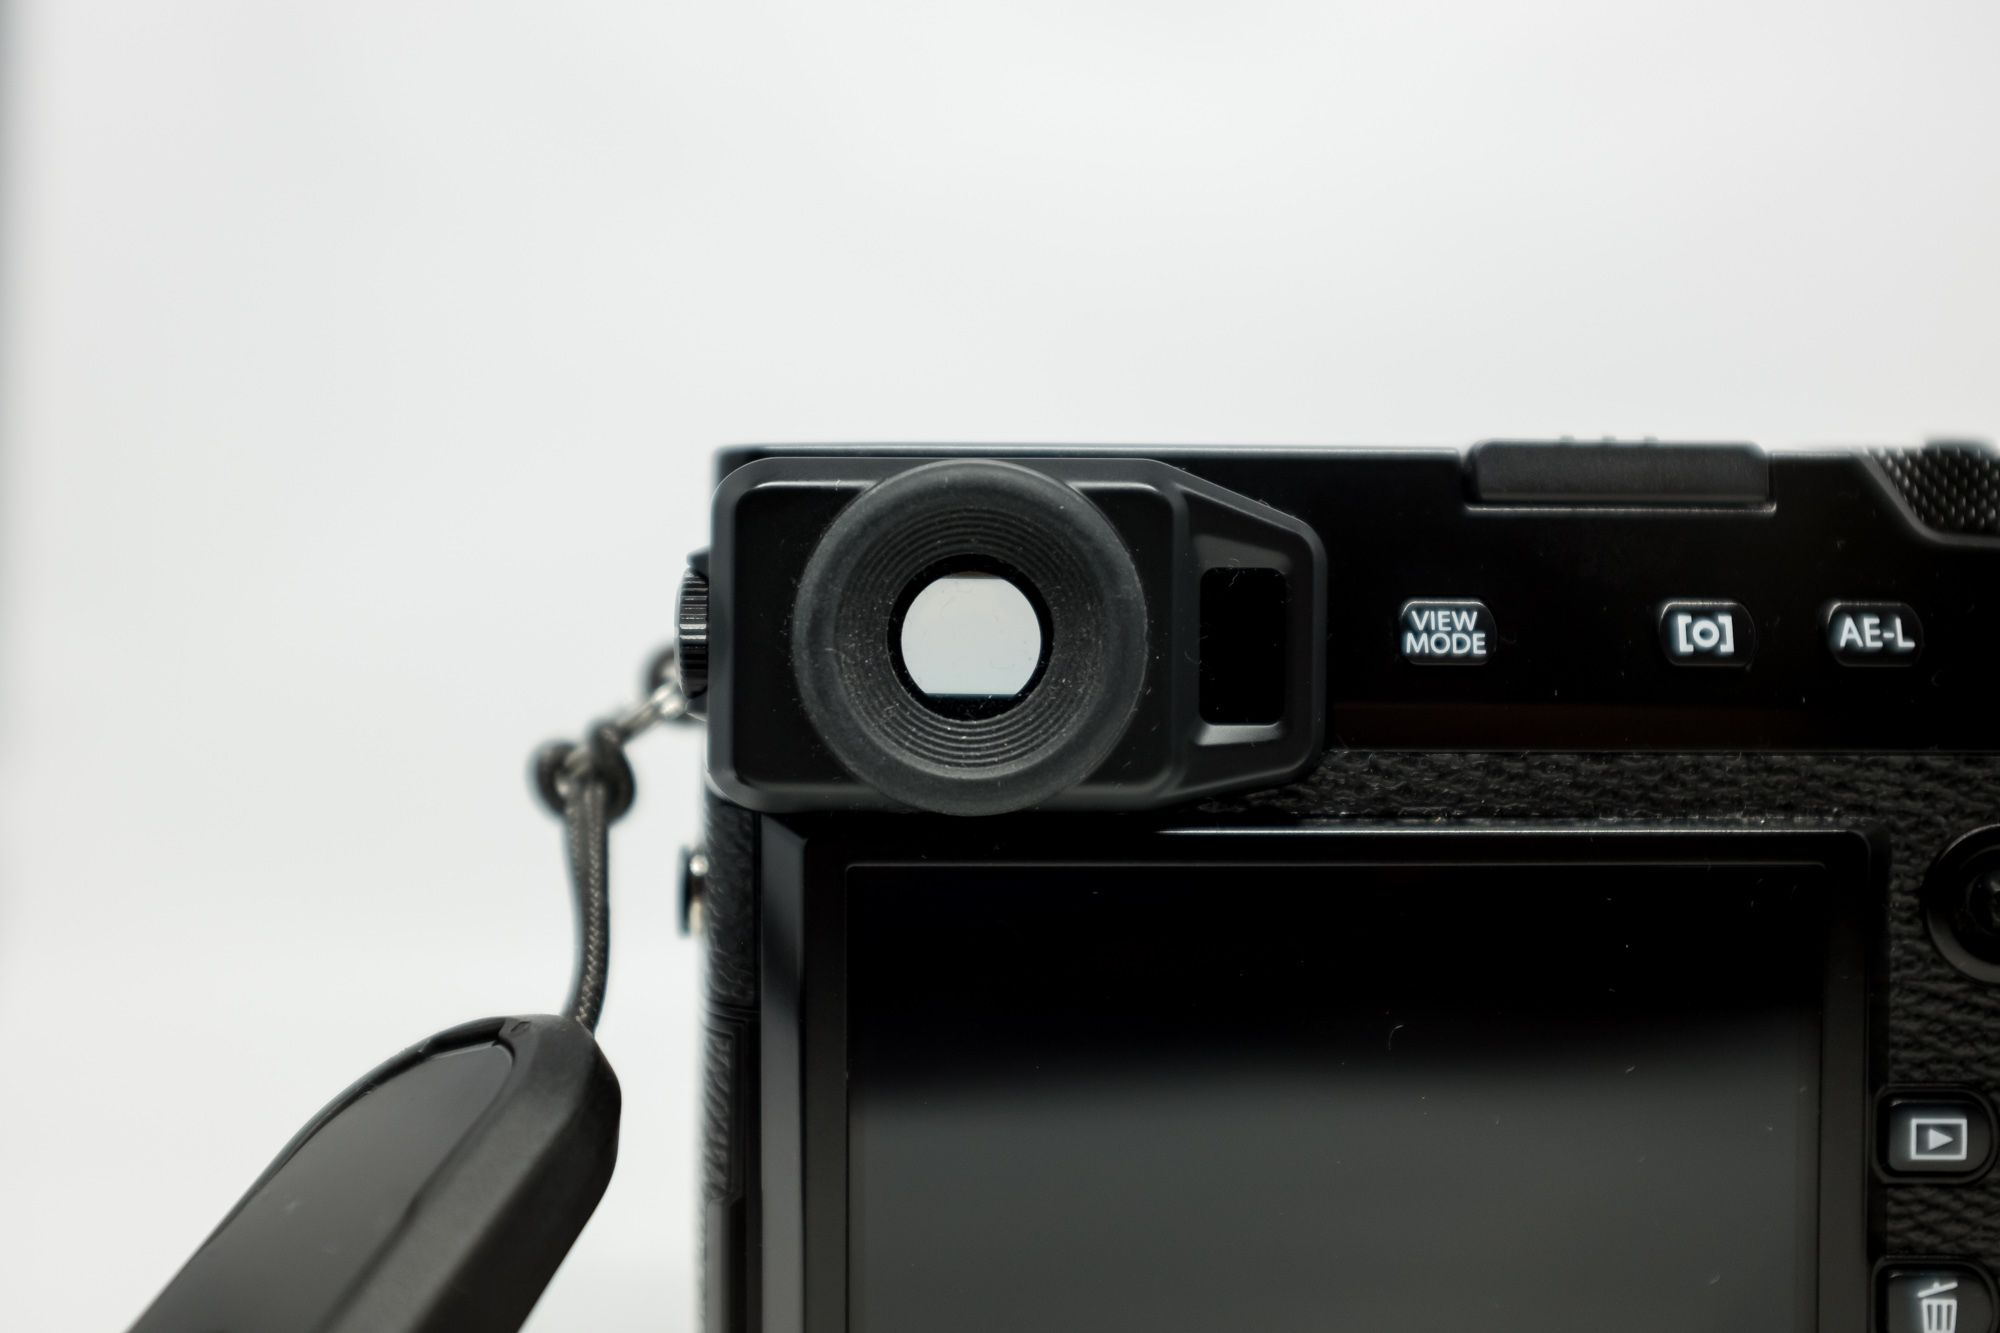
The real upgrade is the improved EVF. The original X-Pro 1 had a relatively mediocre resolution of 1.44 million dots. The X-Pro 2 brings that up to a sumptuous 2.36 million dots, which is the same as the X-T1. Unlike the X-T1 though, the X-Pro 2’s EVF has a refresh rate of 85fps (when in High Performance mode). This is quite a leap beyond the X-T1’s 54fps, and results in a buttery smooth viewing experience.
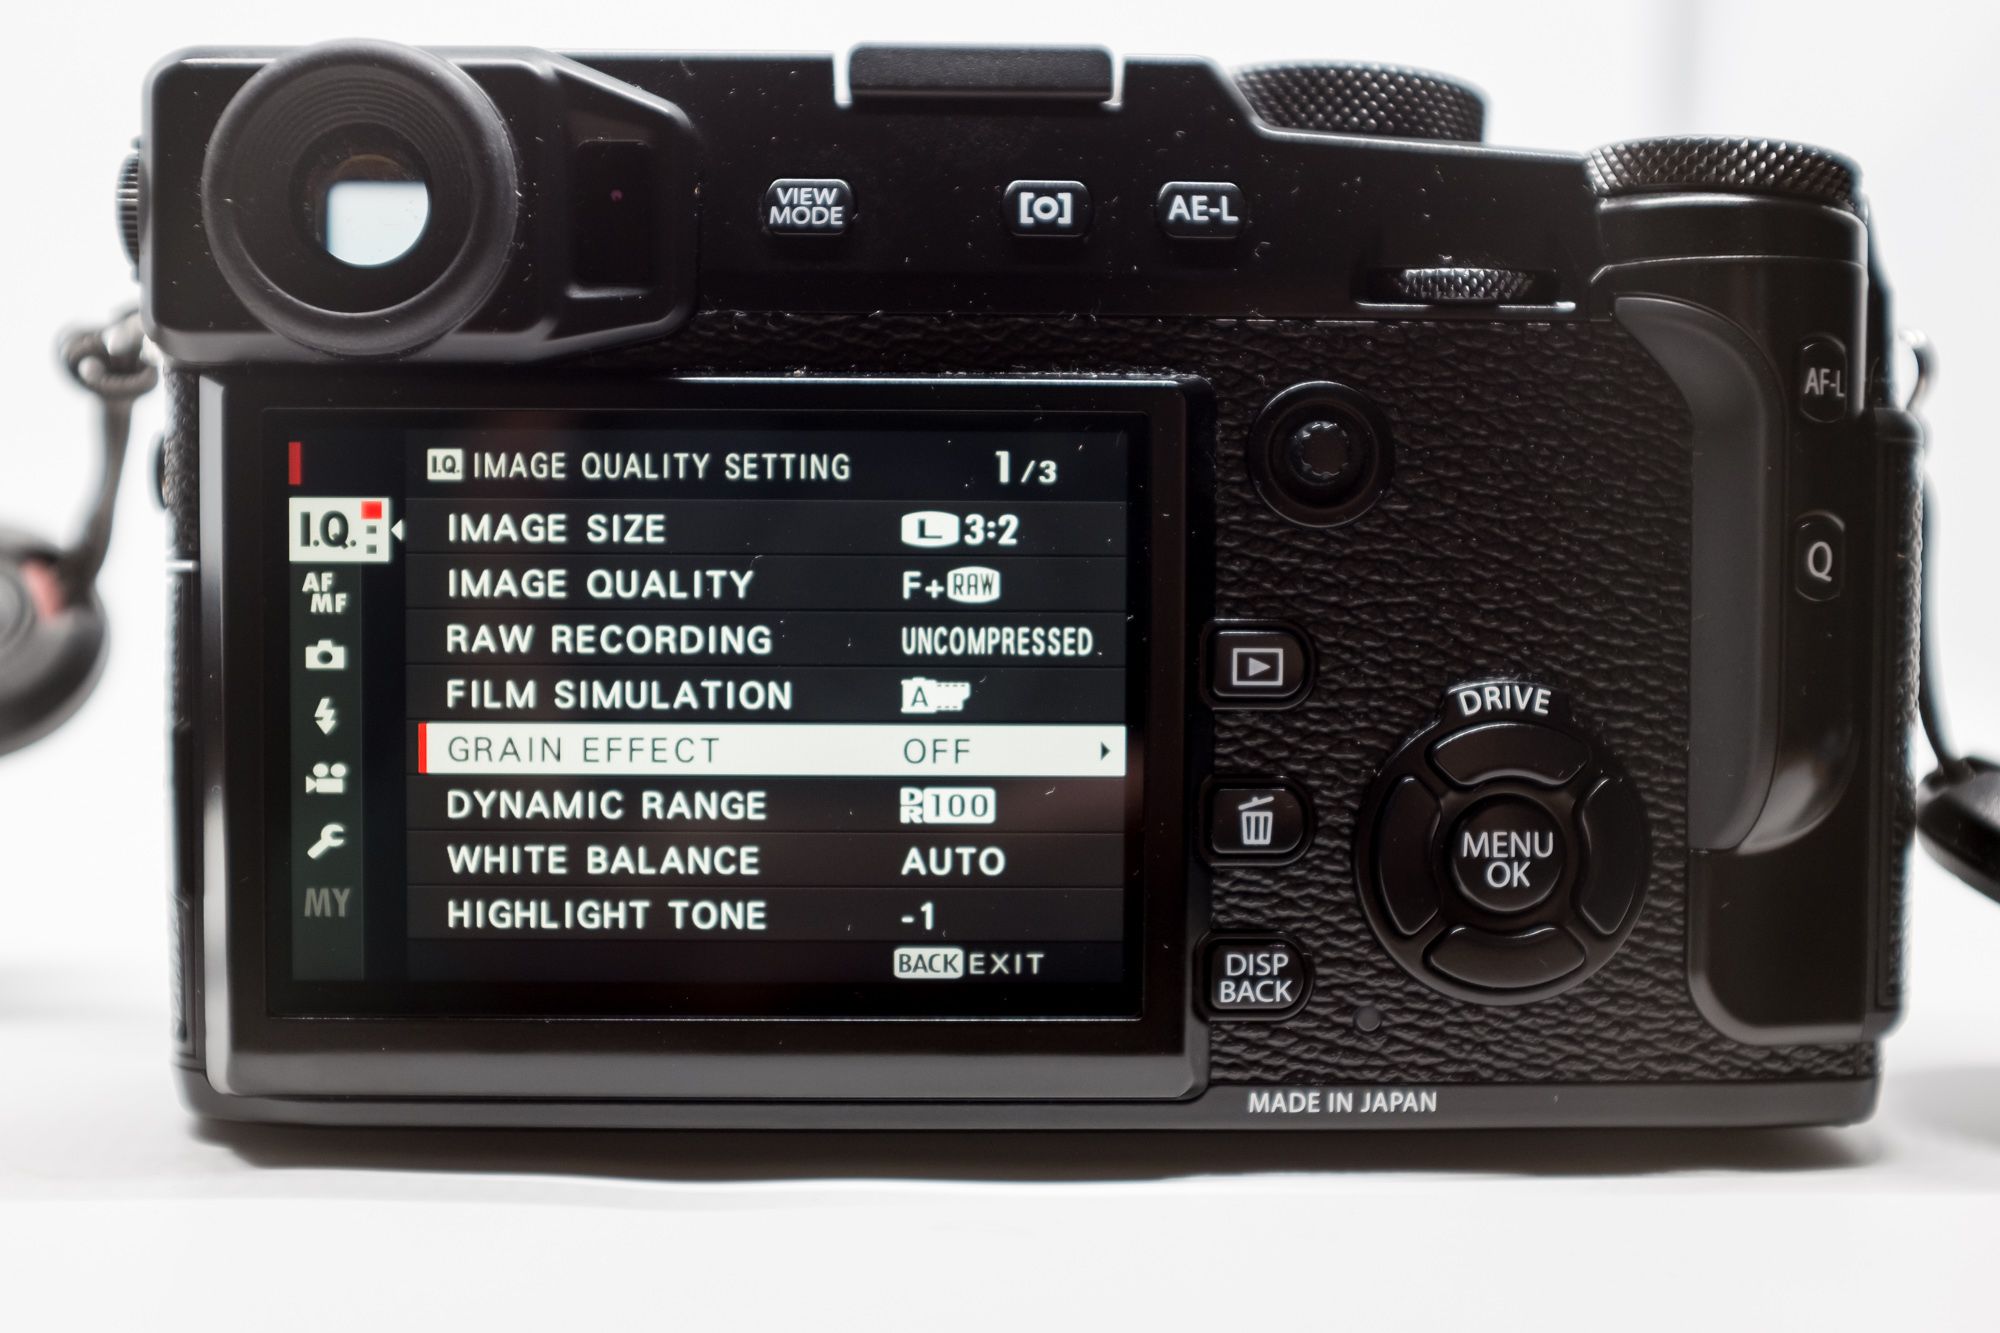
Acros and the Magic of Grain
As you’re wandering through the updated menu system of the X-Pro 2, you may pause—as I did—at two new and exciting additions. The first is a brand new film simulation mode called Acros, which is named after another of Fuji’s classic negative films (Neopan Acros 100).
Acros is one of the latest additions to Fuji’s film line-up, boasting exceptional sharpness and a pleasant rendering of contrast with minimal grain. Flexible and full of character, Acros makes a wonderful companion to the existing film simulations, but its implementation is actually more robust.
Like the original black & white simulation (which remains, by the way), the Acros simulation has variations for green, red, and yellow coloured filters alongside the standard. To keep things organized, Fuji has structured the film simulations menu such that the B&W and Acros presets are now top-level items with a sub-menu for the various filter options. This is a smart way to leave room for future film simulations without having the menu get too crowded.
Visually, Acros is glorious. Compared to the original B&W film simulation, it’s definitely less neutral, with raised blacks and bright highlights. This slight compression of the tonal curve helps subtly pull together elements in your composition, especially in situations with wide dynamic range. I like it and find myself reaching for it enough that’s it’s taken over my Custom Setting 2 in the Q menu.

As happy as I am to see a new film simulation (and please keep them coming, Fuji!) the more interesting addition to the X-Pro 2 is its Grain Effect system. This new menu item allows you to activate either a weak or strong level of simulated film grain to apply to your photos.
The grain isn’t just a static mask either, it’s an algorithmically applied layer that emulates the look and behaviour of analog film noise very convincingly. The best part is that it can be applied to any of the film simulations, and accessed from the internal RAW converter as well.
One especially magical recipe is combining the weak grain effect with the Acros film simulation. I sincerely hope we see Acros and the grain effect make their way to the X100T via a firmware update.
 This was taken at sunset, ISO 6400. The X-Trans III renders noise very pleasantly, but it could be reduced significantly even for SOOC JPGs like this one. I shoot with the Noise Reduction set as low as it can go (-4 on the X-Pro 2) but you can set it as high as +4.
The more I shoot with my Fuji cameras, the less I seem to rely on RAW files for anything but professional shoots requiring a lot of retouching. For my personal work I’m using the JPGs more and more, not only because it’s more immediate but because the lack of editing leeway encourages me to get better shots straight out of the camera rather than relying on post-processing.
That being said, I still shoot RAW+JPG and think that everyone should. Storage is cheap, and it seems silly not to take advantage of the full capabilities of the sensor for archival purposes. Image processing technology evolves very quickly, and I’d rather have the RAWs and not need them than the opposite, even if I mostly use the JPGs.
The Bad News
Despite the praise I’ve heaped on it, there are a few details that I think are holding the X-Pro 2 back from perfection.
Design Quirks
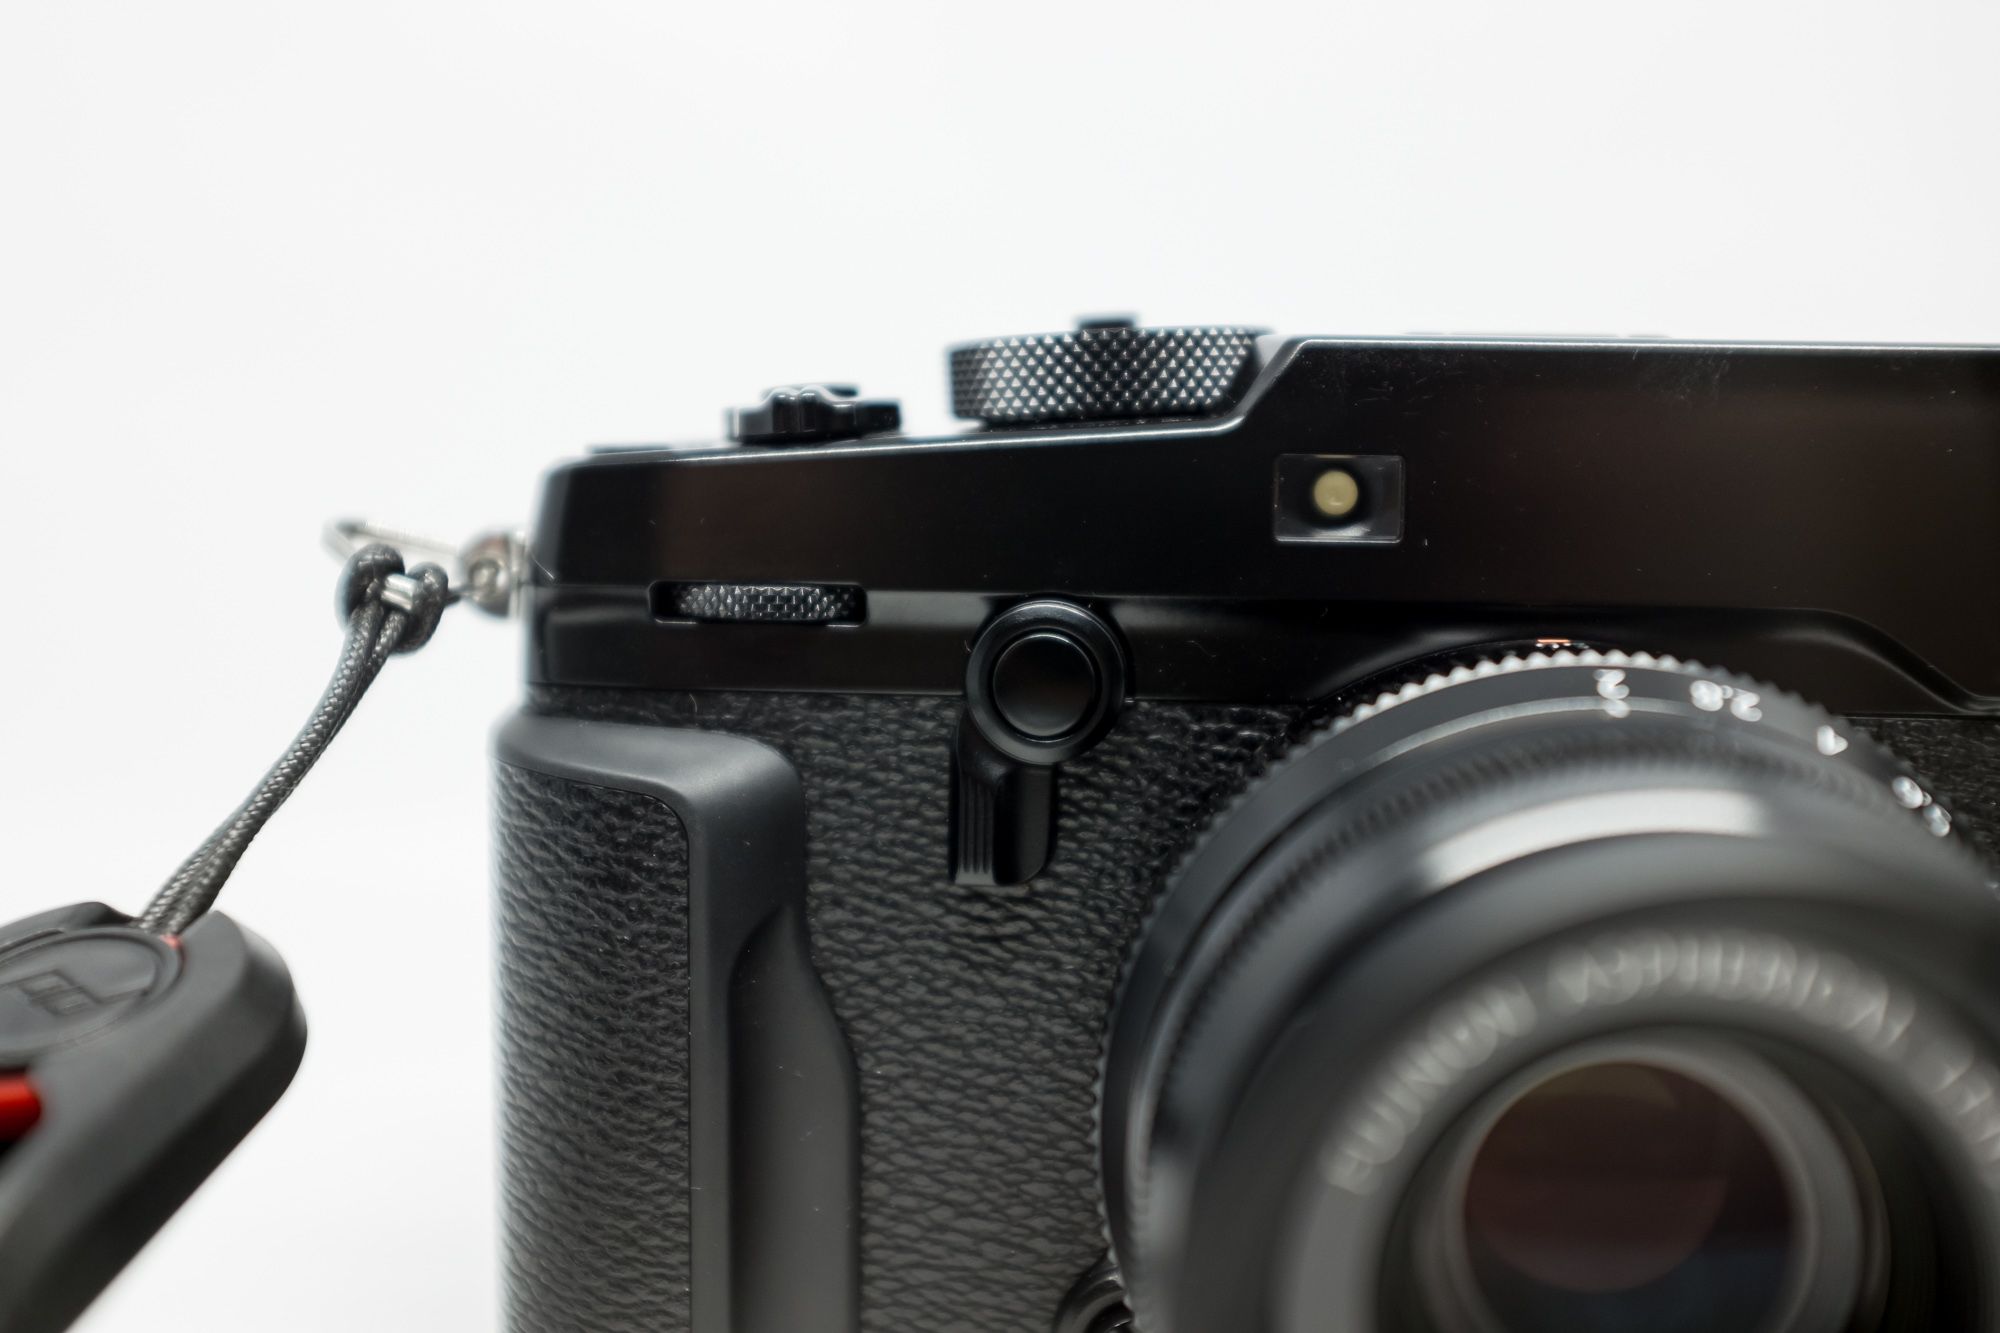
One of the most obvious is the vulnerable position of the diopter adjustment dial. Since it’s situated on the outer edge of the camera’s body, you’re likely to have it knocked away from your intended setting as it brushes against the inside of a camera bag, or your body while it’s on a strap. For a camera whose primary appeal lies in the use of the EVF/OVF, this is a serious annoyance.
On several occasions I thought the camera was failing to acquire proper focus when in actual fact the diopter had just wandered away from the neutral position. After the first time I realized this had happened, I got into the habit of checking before putting it to my eye and it became a non-issue. But it’s a habit I shouldn’t have to form.
The front and rear dials are also thinner than I would like. It might just be that I’ve been spoiled by the prominent dials of the Olympus OM-D series cameras, but returning to the thin and deeply recessed dials of the X-Pro 2 took some getting used to. For one thing, the thinness means you’re more liable to miss them if you’re going in for a quick adjustment, especially if your eye is to the EVF/OVF at the time. Since it’s built into the body (instead of sitting on top like the Olympus cameras), the front dial also sits lower than where my finger naturally falls, meaning I have to spend the additional fraction of a second to move it into place before making an adjustment. Granted, I have large hands so this may work out differently for you, but I couldn’t help noticing it.
I’m also a bit confused about the exposure compensation dial. While I appreciate the added range, the ‘C’ setting seems unnecessary—why not just include the full +/- 5 right on the dial? This doesn’t bother me in practise because I only ever use the exposure compensation to nudge the values up or down by a stop or two at most, but for those who use its more extreme values this seems like a clunky system.
If it sounds like I’m nitpicking, it’s because I am: given the obsessive attention that Fuji pays to the feedback of actual photographers using their products in real-world shooting scenarios, major ergonomic issues tend to get ironed out early. By the time a Fuji camera hits the market, the only things left are generally problems that come down to individual preference and are therefore difficult to address on a mass-market scale.
The Stabilization Problem
Let’s crack open a can of worms, shall we? The X-Pro 2, as expected, does not feature any form of in-body image stabilization (IBIS).
I say “as expected” because I don’t think anyone who’s studied Fuji’s product development priorities realistically thought they’d see this on the X-Pro 2. Don’t get me wrong—I think many people wanted to see it, but it wasn’t in the cards. I’m not upset.
While it’s true that several camera brands have begun implementing IBIS over the past few years, it remains something of a luxury that still hasn’t settled into a definitive part of camera technology. For one thing, there’s still debate about whether it’s best to stabilize the body or the lens (or both). Given the presence of OIS in several of Fuji’s lenses, we can make an educated guess about their thoughts on the subject, but the fact remains that the company doesn’t yet see stabilization as a key aspect of their system. If anything, I think it makes the most sense to introduce it in the X-T2.
I understand the frustration and I suspect that for some this will be a deal-breaker. For my own shooting, the lack of IBIS doesn’t meaningfully impact my work. I love having it when I’m shooting with my Olympus OM-D cameras, but I can’t say I miss it terribly when shooting Fuji, especially given everything else I gain.

I have similar thoughts about the lack of a tilting screen. I find it a lot more useful when shooting video than photos, and I don’t shoot video on my Fuji.
These are all valid concerns, but they have surprisingly little impact on my day to day shooting. They’re subtleties or technicalities that fall firmly into the nice-to-have category, and as much as I hope to see some of them addressed in the future, their absence doesn’t impede my enjoyment of the X-Pro 2 in the present.
Hit Rate
While it’s important to be aware of a camera’s technical capabilities, that’s by far the most boring way to judge the X-Pro 2. When I buy a camera—an infrequent occurrence—it’s because using it allows me to tangibly improve my output, either on a technical level or because of a simple metric: hit rate.
After a day of shooting, how many of the images are keepers?
It’s a fuzzy system to be sure, since the reason for missing a shot is often creative rather than technical—uninteresting framing, boring subject matter, unsuccessful attempt at creative abstraction, more food shots, etc.
Normally, I’m used to losing a number of photos because of my own shortcomings and then an equivalent number to situations where the camera didn’t meter correctly, or missed focus, or any of the small technical hiccups that can compromise a shot. Over the past couple of months with the X-Pro 2, my editing process has been somewhat more sobering, because I no longer get to blame the camera for missed shots.
Instead, I pull images off the card and find that even my most thoughtless efforts are executed perfectly. It may be a boring, useless shot from a creative perspective, but the X-Pro 2 makes sure it’s a technically perfect one. That leaves only me to blame for the misses.

Just to scrutinize this opinion and sculpt it into something closer to fact, I compared the results of two recent shoots: a work shoot and a personal one. I compared these particular shoots because they offered similar challenges: difficult indoor lighting, and the need to unobtrusively capture people in the midst of their activities.
The first was an event a couple of months ago that I shot using an Olympus OMD E-M1 and the full collection of PRO zoom lenses. That setup was without a doubt among the most satisfying I’ve ever shot with—light, fast, sharp, and responsive.
But when I finished the editing process, I was left with 115 keepers out of the approximately 1900 shots I took over the course of two days. Even accounting for the difficult lighting on the first day, and the usual assortment of misses due to my own creative and technical shortcomings, that leaves me with a disappointing hit rate.
More recently, the X-Pro 2 accompanied me on a family trip up north. Out of the 450 or so frames I shot over the course of three days, 45 of them are keepers and I only lost about 15 to technical issues—and most of those were literal technical glitches resulting from the beta firmware! The rest are perfectly usable shots, just not up to par creatively.

This doesn’t mean that the Olympus setup was in any way bad, just that the combination of ergonomic and technical performance allowed the Fuji to deliver the shots that I wanted more consistently.
For me, what hit rate really represents is the level of synergy between your skill and your camera.
When you depend on a tool for your livelihood, being able to trust it this way is important. That trust also extends to the broader ecosystem you’re buying into: are the lenses I need available? Is the camera going to be updated, supported, improved upon? Is my camera going to be abandoned by the company as soon as the next model appears?
Kaizen
What sets Fujifilm apart from almost all other camera manufacturers is their wholehearted devotion to the traditional Japanese principle of Kaizen, meaning continual improvement.
This is understandably endearing to customers, who have grown to appreciate that any Fuji camera purchase is a true investment, one that will be supported and improved upon for years to come.
For instance, the X100—the very first member of the X Series—turns five years old this year, and it’s received 10 firmware updates. Similarly, there have been 16 firmware updates to the X-Pro 1 since its release in March of 2012, several of which added entirely new features alongside significant performance improvements.
To put this into perspective, the Canon 5D MKIII (released at the same time) received 3, two of which were minor bug fixes. Sony’s competing ASP-C mirrorless flagship at that time, the NEX-7, also got just 3 firmware updates before being replaced. In fact, the X-Pro 1 has had more firmware updates than all of Sony’s A7 series cameras combined.
This philosophy is admirable, but tremendously difficult for the company to pull off, because it means that nearly every camera in their line-up is still actively supported. The X-Pro 1 was “replaced” a year ago by a new X-series sibling, the wonderful X-T1, yet it continues to receive firmware updates to this day.

Looking at the bigger picture, this makes it easier to understand how Canon and Nikon attained the status they enjoy today. They earned their popularity, and not just because of technical excellence. They built their reputation by providing reliable workhorse cameras for professionals, and an excellent support system for them.
What the mirrorless market has in technical flash, it tends to lack in dependable trustworthiness. They mostly live in the gap between professional and prosumer needs, and that gap is wider than most people think, because the priorities are very different. The working professional will almost always be willing to sacrifice cutting edge features in favour of a camera that does the job comfortably and reliably, is well supported, and feels like a long-term investment (i.e. a good business decision).
Fuji’s success comes from aligning its values with that exact market: the professionals who are done with DSLRs but want to keep that same trust and long-term support as they move to mirrorless.
Prosumers talk about gear and camera specs. Professionals talk about technique. And both parties buy cameras accordingly.
Early Conclusions
What makes a camera great?
They’re all just sensors, bodies, and lenses. Build a great sensor and you’ve made a camera exciting, but not timeless. Enduring appeal emerges from the space between a camera’s technical details, just as music can be thought of as the space between the notes.
In an ideal setup, there’s almost no distance between vision and execution, and the camera that most successfully closes that gap for you is the one you should be shooting with, regardless of technical merit. It’s why I love my X100T so much.
But in a professional context, a fixed focal length doesn’t always cut it. I’ve been waiting for the camera that takes everything I love about the X100T and expands the shooting envelope enough to make it viable for work as well as pleasure. I guess I shouldn’t be surprised that it’s Fuji who ultimately delivered it in the form of the X-Pro 2.
I’m glad I waited.